The Scene is initially empty and you start with creating a workflow on it:
workflow
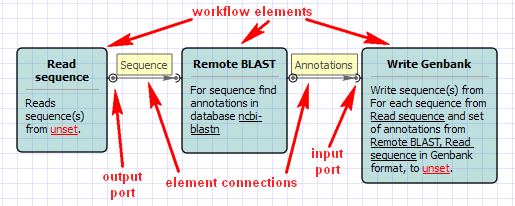
A workflow is a visual representation of the dataflow. It consists of workflow elements and their connections.
workflow element
An element of a workflow. Different elements are used to read data from files on disk, perform some algorithms and to write data to files on disk. Each element contains one or several input and output ports.
element connection
Connection between two elements specifies that data in output port of one element should be passed to a matching input port of another element.
input port
An input port of an element is used to collect data from another element. A workflow element may have several input ports. On the Scene such port is displayed as a right semicircle.
output port
An output port of an element is used to provide data to another element. A workflow element may have one output port or none. On the Scene the port is displayed as a left semicircle.
slot
Each port has one or several slots. A slot is the smallest passageway to transfer the workflow data through. It has a certain type (e.g. "Sequence", "Set of annotations", etc.). So, for example, only sequence data can be passed through a sequence slot.
Thus, an input port has one or several input slots. These slots specify data that are expected as input by the element. An output port has one or several output slots. These slots specify data that the element produces.
In a workflow, an element usually have access to slots of the connected elements, located in the workflow before it.
message
A message is a single data chunk, transferred from an output slot of one element to an input slot of another element. The slots must have the same type to make the transfer possible.
The Scene is initially empty and you start with creating a workflow on it:
See an example of a workflow on the image below:
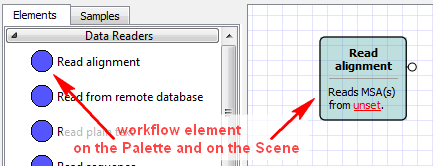
Your first step is to add necessary workflow elements, for example, by dragging them from the Palette to the Scene:
The added element can be moved around on the Scene by dragging it and can be resized by dragging its borders. Read chapter Manipulating Element to learn what else you can do with workflow elements.
If you have two elements with matching output and input ports, you can make the connection by dragging the arrow between the ports:
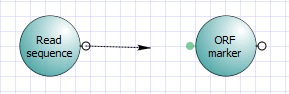
All matching ports of available processes are highlighted while you drag the arrow, besides the arrow sticks to a near match when you drag closer. If an element has a sole matching port, you can just drop the arrow on the element itself to create a correct connection.
Once created, a connection will follow movements of the linked elements; you cannot redirect or reshape the connection arrow but only remove it. You can move the port around an element that it belongs to by dragging it and holding the Alt key at the same time. This is helpful to fine-tune visual layout of a workflow.